Monday, December 28, 2009

Summoner

Summoner


Lore

The Summoner is the newest character class in MU Online. It attacks by calling summoned creatures and also has several very useful magic spells. There are no special level requirements for the Summoner so you can start playing with her directly without having another character (unlike the Magic Gladiator and Dark Lord). The Summoner uses spells so you should focus mainly on her Energy.


Summoners, whose bloodline have been preserved since ancient times possess a natural gift in manipulating magical powers and communicating with another world. By using special scrolls, Summoners can summon mysterious monsters. Through their constant prayers and meditations, Summoners can incapacitate enemies by compromising their weaknesses.


Skills

Drain Life: Drains life from an opponent and restores it to Summoner’s.
Chain Lightning:Shoots a wave of lightening towards an enemy three times.
Damage Reflection: Reflects an enemy's attack. The damage varies according to Summoner's energy.
Sleep: Puts an enemy asleep. A sleeping enemy cannot wake up until the first attack.
Weakness: Weakens damages from enemies' attack for a limited time. A special magic book can increase the success rate of this skill.
Innovation: Lowers enemies' defense for a limited time. . A special magic book can increase the success rate of this skill.
Lightning Shock: Shoots a wave of lightening to enemies within a certain radius.
Berserker: Increases Summoner's attack power, however decreases defense at the same time. This spell cannot be applied to others but Summoner herself.


Summon Sahamutt: Sahamutt is summoned to aid the Summoner in the form of a giant Flaming Tiger


Summon Niel: The Summoner summons Niel to attack with multiple spikes from the ground


Summon Ghost Phantom 2 Ghost Phantoms are summoned to aid the Summoner

Dark Lord

Dark Lord

Lore

The Dark Lords of MU have surfaced to help face Kundun. They are bred leaders as they used to command great armies and creatures of power in the golden ages. As the threat of Kundun grows ever nearer some have decided to return and help the citizens survive these troubling times. Others on the other hand have returned to seize the opportunity to gain power from the battles that are about to begin.

At Lv. 250, the fearsome Dark Lord is unlocked. Riding into battle on his steed, he is a terrifying force that summons his Dark Raven and Dark Horse to do his bidding. He is the only character with the Command stat.


Skills

Force Wave: Similar to the inherent skill of the Dark Lord (Force) but deals more damage and does a penetrating attack.
Earthquake: A destructive war stomp which causes tremendous damage and knocks opponents back.
Fireburst: Bursts out chains of fire which has an area effect. Most popular skill of a Dark Lord.
Increase Critical Damage: Enhances Critical Damage of the Dark Lord and his Partymates.
Electric Spark: Unleashes a powerful surge of electricity that takes down any enemies in its path. This is an area effect spell whose power is increased by the power of the Dark Lord's party.
Summon: Summons partymates of the Dark Lord to any location except Event maps.
Fire Scream: Unleashes waves of fire to damage enemies in front of the Dark Lord.
Birds: The Dark Lord calls a his dark birds to attack the enemies in front of him.

Tips & Tricks
Similar to the Dark Knight the Dark Lord's skill damage is increased by his Energy so don't leave it low.

Sunday, December 27, 2009

Magic Gladiator

Magic Gladiator


Lore

Some men have mastered the art of magic at an early age. Others have mastered the way of the sword. A scant few have managed the impossible. They have mastered both sword and sorcery. These savants of might and magic are known as Magic Gladiators. The Magic Gladiators have found the secrets of casting their magic while wearing armor that would encumber any sorcerer. They can also wield blades as good as any knight. Due to their mystical nature they have endless endurance and can run for great distances. Magic Gladiators are also quick learners and advance faster than other classes.


Upon reaching Lv. 220, the Magic Gladiator is unlocked. These warriors combine spell and sword, bringing both to bear in the defense of MU; their arsenal includes abilities of both the Dark Knight and the Dark Wizard classes.


Skills

Power Slash: Magic Gladiators with special weapons can fire bolts of lightning by channeling their energies through these weapons.
Fire Slash: Mastered only by the Magic Gladiator, the slash of the MG is so fast it creates fire in mid-air. The Magic Gladiator deals a great amount of damage and at the same time creates confusion among the enemy which makes them easier prey.
Flame Strike: Skill that does massive damage with a beautiful arc of fire made by a large sword slash.
Storm: The Magic Gladiator chanelles his power to summon a deadly lightning storm to damage all enemies around him.


Tips & Tricks

Although the Magic Gladiator is good as a fighter (Strength based) and wizard (Energy based), you should choose one way and stick to it.

Fairy Elf

Fairy Elf

Lore

The elves of Noria are an old and ancient race. They claim that they were the first race on MU before the human and goblin. A Norian elf is said to have unearthly beauty and grace. While they may shy away from hand to hand combat, one cannot say that they are weak. The elves were the ones who had taught man the art of the bow. Nobody can beat an elf in an archery contest. The elves of Noria have also made pacts with other races. They call upon such pacts to aid them in battle

The fairy elves are skilled in both archery and magic, combining the two to provide both offensive and defensive support. Their abilities include special arrow attacks as well as the power to Heal, Attack Buff and Defense Buff.


Skills

Triple shot: The elf can shoot 3 arrows at the same time to deal triple damage on enemies.
Heal: Elves can channel their energies to heal themselves or partymates.
Greater Defense: Elves can enhance the defense of targets. The increase in defense depends on the energy rating of the elf.
Greater Damage: Elves can enhance the damage on targets. The increase in damage depends on the energy rating of the elf.
Penetration: This orb allows the elf to shoot a powerful arrow that pierces through targets.
Ice Arrow: Shoots an icy arrow that may freeze targets for a couple of seconds and deal great damage.
Five shot: The elf can shoot 5 arrows at the same time to deal 5x damage on enemies.
Summon Creature: Summons a creature to fight for the elf.

Tips & Tricks

There are 3 ways to make an Elf:
1. Agility Elf - Uses bows and crossbows and deals great damage.
2. Energy Elf - Uses buffs and fights mainly in parties by enhancing the attack and defense of her party members and healing them.
3. Hybrid Elf - Balanced hybrid between Agility and Energy.

To be useful with your agility elf to your guild or party when playing agains another guild, spend some points on energy so that you have a very weak buff. Then if the enemy guild has a powerfull energy elf, just wait for them to cast their buffs, then cast your own to all their guild members so that you overwrite the existing powerfull buff with your weak one, making them an easier targets.

Dark Wizard

Dark Wizard


Lore


Some men strive for physical perfection. Others would rather bend the laws of nature to benefit their cause. The Dark Wizard can command the elements to smite his foes. He can also call upon the spirits to aid him. Most people are wary of the powers of the Dark Wizard and usually leave them alone. However, others make the mistake of thinking them an easy target due to their weak stature. But do not be deceived! Many warriors have suddenly been engulfed in flames before even reaching a Dark Wizard.

Dark Wizards study the mystical arts, crafting the elements of nature into powerful spells such as Fireballs, Aquabeams, and even Ice Storms. They have the highest Energy of all the character classes.

Skills


Energy Ball: The first spell of the Dark Wizard, it compresses his power into a small sphere to be unleashed on his target.
Fire Ball: Even novice Dark Wizarsd can master this simple technique easily. By shooting a huge tongue of fire, it gives a massive damage to enemies.
Power Wave: It shoots a wave of force towards the enemy. Power Wave digs under the ground and moves toward the enemy to deal moderate damage.
Lightning: Lightning spell that can knock enemies back.
Teleport: The Teleport spell allows the caster to relocate himself anywhere within the screen. They use can use the spell to evade attacks or use it to position for a better attack.
Meteor: This spell summons a meteorite from the heavens to smite opponents.
Ice: The Ice spell has a chance of chilling enemies, slowing down their movement and the speed of their attack.
Poison: The Poison spell conjures poisonous vines that sprout from the ground near target's feet that may slow and poison the target. Poisoned enemies will slowly lose life over time until the poison wears off or is cured.
Flame: The Flame spell summons a pillar of flame which causes continuous damage on all creatures it touches.
Twister: The Twister spell allows the caster to conjure small cyclones that can confuse the enemy when they are struck by it.
Evil Spirits: This spell summons spirits to fight on the side of the Sorcerer. This damages all opponents within the sorcerer's line of sight.
Hellfire: Wizards can conjure hellfire that springs up from the ground and hits multiple targets around him.
Aqua Beam: This spell conjures a beam of concentrated elemental water that penetrates through multiple opponents.
Cometfall: The Cometfall spell conjures a bolt of energy that shoots targets from the sky.
Inferno: Inferno spell creates a ring of fire around the caster for a few seconds, instantly burning those who come too close to the wizard.
Teleport Ally: Teleport Ally enables the wizard to summon a member of his party to his location. It is very useful in situations where party members get caught in tight spots.
Soul Barrier: The Soul Barrier spell encases the caster in a sphere of energy which absorbs a certain amount of damage dependent on energy.
Ice Storm: The Ice Storm spell conjures massive shards of ice to fall on enemies and slow down any survivors.
Decay: Causes falling poison balls which deal a huge amount of damage and can effectively "poison" the enemy to death.
Nova: Probably the most powerful spell in the game. The Wizard concentrates all his power and generates a huge explosion of arcane energy.


Tips & Tricks

A good way to win duels and battles is to use your teleport skill and while you're out of sight attack your enemy with lightning. The only way he can counter you is to wait for you to reappear but when this happens teleport again and stay untouchable

Dark Knight

Dark Knight Guide


Lore

During their golden age, the mysterious order of dark knights fought for the protection of the citizens of MU. But those times have long since passed. Due to many wars the order was torn apart. Now the dark knights have become mercenaries to promote their own gain. Some have wandered the land in order to hone their skill to perfection, while others continue to try and bring justice to a time of pain and suffering. But one thing is certain; the dark knights of MU are sights too see pitched in battle.


These dedicated warriors train endlessly to perfect their sword techniques. They channel their high Agility and Physical Strength stats into direct and area attacks like Twisting Slash, Death Stab and Rageful Blow.


Skills

Weapon Skill: Many of the weapons you can equip in the game give you a basic weapon skill that does 200%+Energy/10 damage to the enemy.

Twisting Slash: Acquired from Orb of Twisting Slash at level 20. This skill is very useful because it has an area-of-effect damage and hits all enemies in a 2 range radius around the Dark Knight. Useful agains many opponents.

Death Sab: Acquired from Orb of Death Stab at level 160. This skill is very useful against single opponents. It does geater damage than the weapon skill but drains your stamina. In some game versions the death stab hits multiple targets in front of the dark knight.

Rageful Blow: Acquired from Orb of Rageful Blow at level 170. This skill is very useful against multiple opponents. It does geater damage than the twisting slash and has greater range but drains your stamina and has slower cast time. Effective agains many well-armored enemies around the Dark Knight.

Impale: Acquired from Orb of Impale. This skill does more damage than the weapon skill and can be cast only on mount and carrying a spear-type weapon.

Explosion: Acquired from Orb of Explosion. The Dark Knight uses his weapons to strike a freezing blow to his opponent. The Explosion skill freezes and slows down the enemy making them an easy prey for you.

Raid Skill:This skill is available when using a dinorant. It does greater damage than the impale skill and can be cast with any type of weapon.

Greater Fortitude:Acquired from Orb of Greater Fortitude at level 180. This skill is a type of war cry that boosts your and your party's maximum health. The boost is based on your Vitality and is increased by your Energy points.

Combo:One of the best skills of the Dark Knight. To be able to make a Combo you need to finish the Marlon Quest. To perform a Combo cast 3 different skills in any order from your Weapon Skill, Death Stab, Rageful Blow and Twisting Slash (example: 1. Weapon skill; 2. Twisting slash; 3. Death Stab). The Combo does greater damage than any of the skills you have and hits twice making it a deadly finisher.


Tips & Tricks

Although the Dark Knight uses strength to increase damage there is another way to make him even more powerful. A lot of players forget that Energy increases skill damage. Instead of spending all your points on Strength, try to spend some of them on Energy. It will increase your skill damage with 1% for every 10 points and also will improve your Greater Fortitude ability and will increase your mana points and stamina points. Energy is a very important stat for the Dark Knight and should not be left low.

Since the Dark Knight is a melee class character it is obvious that a ranged class character will have the first hit from distance. Usualy the Fairy Elf freezes the Dark Knight with her Ice Arrow skill and finishes him off before he can reach her. A good way to protect yourself while frozen is to have an equipped shield with the Defend Skill which greatly reduces the damage you take.

Maps

MU Maps


Lorencia

Lorencia is a wide plain located in the center of MU. Dark knights and Dark Sorcerers begin their careers here. Due to heavy rainfall tall trees and grasses abound. It is a suitable hunting place for low level (1-20) adventurers.


Level Limit: Dark Knights and Dark Wizards were born in this place. If a fairy elf wants to go to Lorencia, needs to be over level 10.
Features: This is the place that Dark Knights and Dark Wizards start an adventure.
Monsters: Spider, Budge Dragon, Lich, Bull Fighter, Giant, Hound, Elite Bull Fighter, Skeleton Warrior.


Noria

Noria, the home world of the Fairy kingdom, is a huge woods located in the easternmost of the MU Continent. Originally, Noria was once populated only by the Fairies, but after Kundun's invasion of MU, exchange between humans grew more frequent and human settlement in the region became more pronounced. Fairy characters all begin their careers within Noria. The region's location may seem trivial but as the access point for the East Sea and the underwater city of Atlans it plays a significant role. The Chaos Goblin that creates Chaos items and Wings through the unique Chaos System also resides here.


Level Limit: The land of Fairies. Dark Knights and Dark Wizards should be at least level 10 to move freely within Noria.
Features: The start point for Fairy characters. The Chaos Goblin is located in this place.
Monsters: Chain Scorpion, Goblin, Stone Golem, Agon, Forest Monster, Elite Goblin, Hunter, Beetle Monster.


Devias

Devias is a snowfield located at the north of Lorencia and it covered with perpetual snow. Monsters here are more powerful than those in Lorencia or Noria so only adventurers over leve 15 can enter Devias. The guild master who creates and manages guilds is also located in Devias." should be changed to "Devias is a snowfield located at the north of Lorencia and it is covered with perpetual snow. Monsters here are more powerful than those in Lorencia or Noria so only adventurers over level 15 can enter Devias. The guild master who creates and manages guilds is also located in Devias.


Level Limit: A minimum level of 15 is required to enter.
Features: A snowfield where strong monsters reside. The Guild master who manages guilds is located here.
Monsters: Yeti, Elite Yeti, Ice Queen, Assassin, Ice Monster, Worm, Hommerd.


Dungeon

The Dungeon is a formidable cave located to the north of Lorencia. With a total 3 levels, The Dungeon is home to the Gorgon, a frightening beast that lays in wait on the lowest level. Many a brave adventurers has entered the Dungeon but few have returned to tell of their tale. Due to the lure of untold treasures within these caverns, but beware, Hell is but a stones throw away from the horrors that reside here." should be changed to "The Dungeon is a formidable cave located to the northeast of Lorencia. With a total of 3 levels, the Dungeon is home to the Gorgon, a frightening beast that lays in wait on the lowest level. Due to the lure of untold treasures within these caverns, many a brave adventurers have entered the Dungeon but few have returned to tell of their tale. If you are brave then venture forth but beware, Hell is but a stones throw away from the horrors that reside there.


Level Limit: A minimum level of 20 for the first floor, 40 for the second floor and 50 for the third floor are the requirements for movement.
Features: Complicated three-story cave. Strong monsters live here.
Monsters: Ghost, Dark Knight, Cyclops, Larva, Skeleton Archer, Elite Skeleton Warrior , Skeleton Warrior, Thunder Lich, Hell Spider, Hell Hound, Poison Bull, Gorgon.

Atlans

The once beautiful Ocean of Atlans, became inhabited by one of Kundun's Strongest Monsters, the Hydra. The Hydra then summoned several sea monsters to guard the pathway to Tarkan. Atlans is on the southern part of Noria and is not for the weak. The Treasures of Atlans is guarded by the Hydra for a reason.


Level Limit: Character level 60 and above may walk to Atlans but must be 70 and above to warp there. Characters with level 5 Gloves and above may utilize a faster swimming speed as they race through Atlans.
Features: Strong adventurers may challenge the Hydra and his army of sea monsters. Though not all will survive, those who do are astounding.
Monsters: Bahamut, Vepar, Valkyrie, Great Bahamut, Silver Valkyrie, Lizard King and Hydra.


Lost Tower

The Lost Tower is a huge tower located to the north of the MU continent. The Lost Tower had once been used as a shrine, but after the plunder of Kundun, it has become an utter wasteland. Kundun has assigned various forms of dreadful monsters to each floor of this tower. Balrog, a foul beast located on the top floor that flourishes a scythe waiting for its prey. There are few warriors in the land of MU who can compete with him. in the land of MU who can compete with him.


Level Limit: Characters level 80 and above may move to the Lost Tower but must be level 90 and above to warp there. A level over 80 is required for the second floor, 90 for the third floor, 90 for the fourth floor, 100 for the 5th floor, 100 for the 6th floor and 110 for the 7th floor.
Features: Highest degree of difficulty, best items and treasures, prime hunting spot for exceptionally strong adventurers. Levels 90 can warp to Lost Tower.
Monsters: Devil, Death Cow, Death Gorgon, Shadow, Poison Shadow, Balrog, Cursed Wizard, Death Knight.

Tarkan

The Desert of MU, Tarkan holds host to some of the strongest monsters. Only few stray to Tarkan to seek the treasures guarded by the Zaikan and the Death Beam Knight. The remains of many warriors who dared travel to Tarkan can still be seen lying in the desert.


Level Limit: Characters of level 130 and above may reach the desert of Tarkan. Characters with level 140 and above may warp directly to the deserts of Tarkan.
Features: Tarkan holds many great treasures gaurded by Zaikan and the Death Beam Knight.
Monsters: Mutant, Bloody Wolf, Iron Wheel, Tantalos, Beam Knight, Zaikan, Death Beam Knight.

Icarus

The path in the sky, Icarus is one of the toughest maps and only the highest levels can survive there. Either wings or a flying mount is required to enter this map. Guarded by the Dark Phoenix, only the strongest teams stand a chance of reaching the end.


Level Limit: Characters of level 170 can warp while riding a flying mount or with wings, or walk in at 160 with a flying mount.
Features: Great treasures await those who are able to defeat the guardians of the sky.
Monsters: Alquamos, Mega Crust, Queen Ranier, Drakan, Alpha Crust, phantom Knight, Great Drakan, Phoenix of Darkness.


Kalima

The world that Lord Kundun has been banished to houses his most loyal minions. Not just anyone can enter Kalima champions of MU must first find the Lost Map which can be made from finding 5 pieces of the Lords Mark. There are 6 gateways to Kalima and Champions are only allowed to enter the levels in which they are allotted. Only in Kalima 6 will Champions find the true Lord Kundun himself.

Level Limit: Kalima is broken into 6 levels of entry based on your characters level. But anyone above level 15 may enter their respected Kalima.
Features: Kalima houses items not yet seen to the Continent of MU; also in Kalima 6 Lord Kundun himself awaits your arrival.
Monsters: Aegis, Lord Centurion, Blood Soldier, Death Angel, Necron, Death Centurion, Schriker, Illusion of Kundun.

Story

MU Online Story

The Prophecy


The Heavens shall open again, the Stars will lose their way, and Fear descends upon the earth. A saint awakens and destroys the Seal of Chains. Ravenous teeth shall rape the land, the land! Tis cruel! Crimson Blood stains the ground.
Under the Sun, The 8 Jewels of Legend and Lore shall appear, and Satan will have arisen. . . Heed these words ye wise man! A day shall come upon which the soil shall 8 Stars be affixed, Nightmare's Day shall it be called when Heaven's Rays divide the sky and echoing wails ring in the Valley of Death, and a light will come down upon this land from the world once forgotten.

Prologue

The King of Blood


Antonias, the Prince of the Black Knights, was nearing the realization of his foolish ambitions.
"MU shall be mine and mine only! Foolish, pitiful men, look upon my might as I break the Seal to my destiny."
An evil sorcerer named Lemulia had warmed to the foolish Lord and seduced his mind with false hope for Antonias had become sickened and weary of the ceaseless battles between the feudal lords of MU. Lemulia spoke endlessly about a tale of a Great Lord, a Demon, the Devil of Darkness, Kundun who had existed 1000 years ago before the MU Empire was born. She spoke of how those who allayed themselves with the Dark Lord would be masters of the whole world and not merely an empire or a continent. Antonias, blinded by ambition fell easily into Lemulia's ploy. Those who saw past Lemulia's veil of deception, loyal and altruistic advisors were immediately put to death and all that remained was the naive Lord, the evil Witch and cruel, blood thirsty warriors.
The army of Antonias kept laying havoc to the land, conquering the Empire by force under Lemulia's cunning tricks and sorcery, and within time, on the ominous day mentioned in the Prophecy of the Secromicon, the forces of Antonias gathered at Ketthotum. The ghastly, merciless soldiers of Antonias anxiously waited for the moment when Antonias and Lemulia would break the Seal. The wind fell silent and the air was filled with uncertainty as the moments trickled by.
The Shrine of Ketthotum undulated grotesquely. For a brief moment, a look of panic crossed Antonias' eyes. "Is all well, Lemulia?" The Sorcerer Lemulia hidden in a black shadowy robe nodded her head. "Only for the King of Land! The moment is upon us." Antonias' confusion and uncertainty remained but was seemingly satisfied with her reply. Antonias then shouted, "This land shall remain mine for all time." and attempted to touch the Seal of Etramu.
"Om Orakust, Hemiad, Kiratus. Le Al Hokbras, Ektua, Ho."
An unknown incantation spewed from Lemulia's mouth and at the same time a bluish protective curtain surrounded Antonias. At this very moment, the Sealing Stone started to shed light. While Lemulia's incarnation got louder and bolder, a look of madness began to flow and dance in the eyes of Antonias as he stared betwixt upon the jewel. "A little more, a little more..." Antonias' hands were trembling, as he approached the Sealing Stone. The light emanating from the stone began to spasm "just a little more." - Clink! Before Lemulia's incantation had finished, the Sealing Stone shattered. "The King, the King of Blood!!" In the midst of the din of the soldiers' rapturous voices calling out to their master, the Devil of Darkness, Kundun had resurrected. Kundun who woke up from sleep fiercely stared Antonias and shouted, "Now the land is only my own! Only the blood and fear will fill up this land!" And the 8 pieces of the Sealing Stone scattered far and wide to each corner of the vast continent that is MU.


Story


In a millennium's time, the Land of MU has advanced and developed the empire in great bounding strides. However, as foretold in the Great Prophecy, Secromicon, the Continent of MU fell into overwhelming chaos. Great leaders who had once controlled the MU Continent now have fallen low, and the central government; due to the internal strife and warfare amongst power hungry feudal lords, have brought the kingdom asunder and thus the empire crumbled. The millennium of peace and bounty is now a mere memory and dark stains of blood now cover the land. The ravages of war have laid waste to the once beautiful land and the shedding of blood still knows no end. Even now, petty feudal lords endlessly build up their machines of war and futilely attempt to re-establish what once was.
And it was during this time of endless blood letting that the Gates of Hell were thrown open as the blind ambitions of a foolish man had been led far astray.
Antonias a foolish Lord, blinded by ambition, deceived by the evil Sorceress Lemulia, unknowingly let loose upon the world, Kundun, the Devil of Darkness, a demon difficultly confined by the Seal of Etramu.
"Now this land shall be mine again. I have banished Peace for all time… the Sun will no longer shine. This earth shall be mine, and cunning men will be my slaves and cattle.
"The Ancient Devil Kundun awake from its long sleepless slumber now walks amongst the living defiling the land with his touch. Amidst the chaos, the stars have lost their course and the stench of fear and blood pervades throughout. Kundun released upon the land his rage and vengeance for his long confinement. Quickly, the now forsaken land of MU has become home to Kundun's minions and for 2 long years the evil of his reign befouled all that was once pure. Nightmare's Day, a passage in the Great Prophecy, had come true and was no longer merely the words of days gone by. Wise men began their studies anew and hopingly and longingly referred to the ray of light mentioned within the writings of the prophecy. Their last remaining hope lay in the power of the seal of Etramu, the very seal that maintained Kundun's imprisonment. Into 8 pieces the seal has been scattered and only when the seal is made whole shall peace return to the land once more.

Guardian Upgrading Item

Upgrading 380 level Items with Jewel of Guardian


- Gaurdian Option


How to Upgrade

Guardian options (pink) can be added only to items with 380 level requirement. To upgrade your item put it in the chaos machine with 1 Jewel of Guardian and 1 Jewel of Harmony. All types of items have a different "pink" option

Pink Options


Harmony Upgrading

Upgrading Items with Jewel of Harmony


- Harmony Option


How to upgrade

To upgrade your item simply drag and drop your Jewel of Harmony over it. There is a chance of failing whereyou will lose your jewel. When the upgrading succeeds the item will be bound to you and you will not be able to sell or trade it until you remove the option (in Aida). To increase the level of the option use Low/High Refining Stones


Saturday, December 26, 2009

Basic Gameplay

Basic Gameplay Guide

Basic Controls

Left Mouse Button: Move, Attack, Lean, or Sit-down options
Right Mouse Button: Use spells or skills
[Ctrl] + Mouse Button: PK Attack
F1: Help
F2: Dialogue toggle
F3: Toggle whispering on chat mode
F4: Adjust chatting window size
F5: Toggles MUssenger chatting window when receiving incoming message
F6: Hides MUssenger chatting window
Enter: Open chatting window
D: Automatic Commands
M or /Move: Move between maps or worlds
C: Character statistics
I or V: Inventory
Q: Default shortcut key for healing items
W: Default shortcut key for mana recovery items
E: Default shortcut key for curing (antidote) items
F: Toggles MUssenger
Shift: Hold character in position
[Ctrl] + Number: Bind Spells/Skills to #1-#9
Number #1-9: Select bound Skill/Spell
[Alt]: Display item names on the ground
[Alt] + Left Mouse Button: Individual selection of items on the ground
Spacebar: Automatic pickup of items on the ground
Print Screen: Screen capture /Take Screenshot
/: View item information (case sensitive), F1 toggles window off
/Request : Toggles requests for deals, party and trade on and off
/Duel (pointing at player): Challenges the other player to a duel


Party Commands

/Party (pointing at player): Create a Party; invite people to current party
P: Party setup window


Chatting Functions

[Tab]: Switch between chat and ID box
Right Click on message: Capture whispering ID
Up and Down Keys: View chatting history
Page Up and Page Down: Scroll message
~ : Send Party message
@ : Send Guild message
@@ : Sends a message to the alliance
# : Make message appear longer
/filter (word1) (word2): View messages with specified word(s) (case sensitive) * To turn off type /filter without any words attached


Trading

/Trade: Initiate Trade


Guild Commands

/Guild (pointing at player): Request a Guild Master to accept you into the guild
G: Guild menu
@> : Post message to guild members (Guild Master function)
/War : Declare a guild duel
/Battlesoccer : Challenges opposing guild to Battle Soccer


Command Window


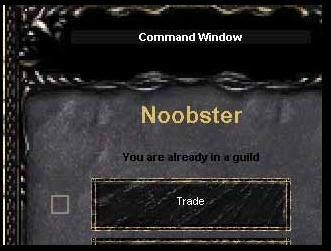
The command interface can be accessed by pressing the "D" key on yout keyboard. This will open up a command menu that will show you possible actions that your character can do. This is an alternative to using the / fucntion. Most actions in the command window will require you to target a player in order to execute the action.


Reassigning Shortcut Keys


The Q, W, E, shortcut keys are by default assigned to Healing items, Mana restoring potions, and Antidote/Cure potions respectively. You can reassign a new item to the shortcut keys by moving your mouse over an item in your inventory (e.g. a town teleport scroll) and then pressing CTRL and the letter where you would like to assign it to (for example "Q"). Shortcut key "Q" will now be a shortcut to use the town teleport scroll instead of Healing items. You can only assign shortcuts to the letters Q, W and E.


Binding Spells


You can assign shortcut keys to your skills and/or spells with the numbers 1 to 0. Click the skill/spell button at the bottom-middle of your screen and all the skills/spells you learned or acquired will appear. Hover over one of the skill/spell and press CTRL and a number you would like to assign the skill/spell to (i.e. CTRL + 1). Now, whenever you press the number 1 your current skill will switch to the skill assigned to that number.


Using macros


You can also assign shortcut keys to messages that you use frequently, like "Hello, how are you?" To assign these shortcut keys, you need to open your chat box by hitting the ENTER key. Next, type "/1" (without the quotes) and the message that you want assigned. This will assign your message to the number 1. Your stored messages are accessible by pressing the ALT key and the number you assigned your message to (in this case, the number 1). You can assign messages to the numbers 1 to 0.


Warping


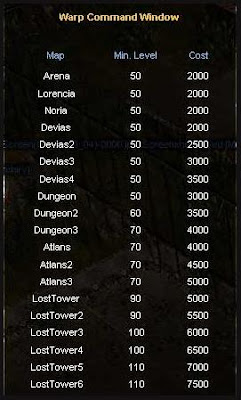
Once a character's level is over 50, warping between areas becomes possible. While you can move from point to point by walking or with the use of a mount, traveling by these methods is often tedious and time consuming. Therefore, adventurers who have attained a level over 50 can take advantage of traveling by warping. The use of this movement command is quite simple. However, each area has certain level limits dictated by your preferred choice of either walking or by application of the warp movement command and warping to different areas cost a certain amount of zen.


Chat

MU provides a function allowing you to chat with other users. To chat, press Enter on your keyboard to initiate the chat option and after typing your message, press Enter again. The Chatting window is used as a tool for conversations, but it also works as a console for special functions like moving or trading. Upon pressing the Enter key, the Chat window will appear at the bottom of the screen. Messages will appear within a bubble and people within your vicinity will be able to read them.


Whisper

People close to you can hear general conversations, but by use of the Whisper function, you will be able to have conversations with people who are outside the vicinity of the normal chat function. Whispering is a player-to-player conversation and other players will be unable to eavesdrop. When a highlighted ear-shaped icon appears, this indicates that the Whisper function is currently active. With the simple click of your mouse, you can activate or deactivate this function. Whispering is possible with a maximum of 5 players.


Party Chatting: ~(message)

You can send private communications to your party also known as the party chat by putting a tilde (~) before your message on the chat window. Party chat will appear colored blue on your chat box.


Guild Chatting: @(message)

You can send private communications to your guild by putting an "@" before the message you send. Guild messages will appear in green and can only be read and sent by members of your guild.


Group Communication: @@(message)

You can send a message to your allied guilds by putting an “@@” before your message. This message will appear in bright yellow font.


Mussenger

Mussenger is a chatting system that allows you to chat with different players at the same time and keep a friend list that shows you the online/offline status of each friend.

Unlocking Bonus Options

UNLOCKING BONUS OPTIONS

USEFULL HINTS

Seed Items with mounted SeedSpheres gives us Seed Options which we can see near Ancient Options in Inventory.Seed Items can be only Regular or Excellent. They cannot have Harmony Option.

We can get Seed Set option in following ways:

In our gear we must put at least:

A
1 Fire Seed
1 Water Seed
1 Ice Seed
1 Wind Seed
1 Earth Seed

Set Option : Double chance of damage +3% increase

B
1 Fire Seed
3 Water Seed
1 Ice Seed
3 Wind Seed
2 Earth Seed

Set Option : Enemy defensive strength disregard attack +1%


BONUS OPTIONS

To increase options to your socket item, you may add two or more seed spheres.
The option will be randomly given depending on the seed spheres and the order that you combine them.


Set Socket Option
Wearing socket items may induce set socket option effects.


If you wish to destroy a seed sphere in the socket item, please visit NPC Seed ResearcherYou do not need neither an item nor zen to destroy.Once you confirm to destroy the seed sphere, it will erase all the options in the item as well as destructing the seed sphere.

Samples:
-I'll post more pictures along the way


Enjoy!


like us on facebook


Socket System

Socket System

How it works
(Empty Socket Item) + (Create a Seed + Combine with a sphere) = Socket Item + Options

STEP 1) Get empty socket items.: Monsters from La Cleon

STEP 2) Create a seed through NPC seed master at Elveland.

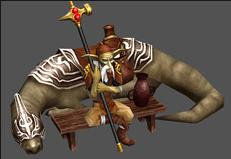
Seed Master


Seed Recipe


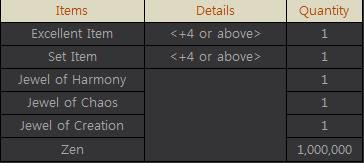
The success rate depends on the level and items used for combination.
When it's successful, it creates one of seeds below.


When it fails, all the jewels will disappear and Excellent or Set items will randomly downgrade to level 0~2.

STEP3) Combine a seed and a sphere to get a Seed Sphere.

Sphere

It does not have any function or effects as it is, and you cannot mount it to socket alone


Visit NPC Seed Master as before to combine a seed and a seed sphere.

Combination Recipe


Seed Sphere


When it's successful:
A seed sphere will be created. Once this is mounted to a socket item, it will give item a special options.The better quality the sphere has, the stronger option it will induce.

When it fails:
All the items that were put into combination will disappear.

STEP 4) Mounting
Go to Seed Researcher in Elveland to mount a completed seed sphere to a socket item.
Attack weapons :Fire, Ice, Lightening seed sphere only
Defense weapons: Water, Wind and Earth seed sphere only

Seed Researcher


How to mount:
First, select items to combine.


To increase options to your socket item, you may add two or more seed spheres.
The option will be randomly given depending on the seed spheres and the order that you combine them.


Set Socket Option
Wearing socket items may induce set socket option effects.


If you wish to destroy a seed sphere in the socket item, please visit NPC Seed ResearcherYou do not need neither an item nor zen to destroy.Once you confirm to destroy the seed sphere, it will erase all the options in the item as well as destructing the seed sphere.

Seed and Sphere

Seed is basically like a jewel that can be created using an NPC called SEED MASTER.


SEED MASTER

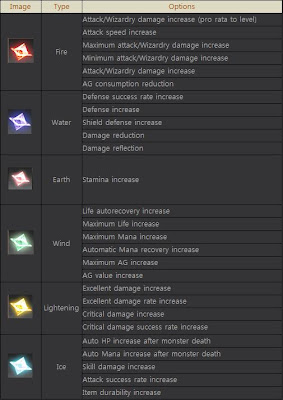
There is a total of 6 Seeds and each has its distinct option.
Seed is use always with Sphere, without sphere, seed is useless.
This means, to use seed, it must be combined with Sphere.


SEED = Can be found on La Cleon and Swamp and Vulcan map.
*im not sure about this one but I got all my seeds by creating them


SPHERE = Can be found on La Cleon, Swamp,Vulcan map, Devil Square 7 and Blood Castle 8.

* Spheres, rank thru its quality (From Low To High)

1. Chipped Sphere
2. Flawed Sphere
3. Natural Sphere
4. Flawless Sphere
5. Perfect Sphere


SEED SPHERE= adds a Seed Option to item (Depending on item kind)
You can create 30 kinds of Seedspheres with 1 option.
all Seedspheres can be used on all items.

SEED OPTIONS:Sets & Shields = Water, Wind, Earth
Weapons = Fire, Ice, Lightning


like us on facebook